![]() (click to open a colab session with this code)
(click to open a colab session with this code)
Code repository found here.
Cartoon animation has had an interesting technological history. Every time new tools, algorithms, or graphical advancements were invented, some artists became concerned that the traditions of their wonderful craft would be automated away and relegated to The Tomb of the Lost Arts. Instead, what technology provided was a new toolset for the artists to work on top of which resulted in creations that were impossible for previous generations of artists. Rather than build a sandcastle by placing individual grains, artists began arranging pre-fabricated mud turrets and delivered sand empires.
DeepSIM
Machine learning (ML) is heralding another serious reconfiguration of the animation artists world. With ML, artists can generate concept art by tweaking a few parameters of very complex systems, fabricate entirely new poems, folktales, or interviews of favourite authors (including my favourite recreation of Lem snippets), or work alongside generative models to build a symbiotic amalgamation. I’ve been drawn to a specific machine learning subfield that has grown in application in the last few years. This subfield is strange and uncouth because it doesn’t use the large volumes of data that have been the life oil for the majority of industrialized applications of ML today. Large volumes of real life data that is. This subfield uses just a single piece of data. The first research to introduce me to these single-data models was Neural Cellular Automata, in which a neural network is used to learn a cellular automata update function that results in the generation of a single target image. To maintain stability of the generation, they bombard their image with simulated user-damage, and scramble the initial state with different failure states sampled from the dynamic rollouts during training. I’ve been doing some interesting experiments with this model, which I’ll summarize in a future post.
For now, I’d like to talk to you about another single-datapoint model that I came across. The model, DeepSIM, uses one real life image to build a model that can understand the physical semantics of the objects in the chosen image and generate plausible variations of said image. To achieve this, it makes use of a second user-designed image that is some kind of simplified or segmentated version of the real life image. By applying identical edits to both the user-designed image and the real life image, the model learns mappings between the real and user-designed domain, building associations between the two images based on visual cues such as texture, color, and the relative position of objects in the images. In machine learning, this editing of images is called data augmentation and has a lot of history. What’s impressive is that the DeepSIM paper achieves their result with only using one type of data augmentation: smooth spline interploations of the image’s color space. Here’s a photo of me before and after serious deformation damage has occurred via spline interpolations:

The original DeepSIM paper applied this approach to quite a few interesting problems. Below is an example from their paper where the two images they use are a real life photo of a starfish and a simplified ‘segmentation image’ of the different arms of the starfish, coloring each arm a unique color like some nightmarish color wheel. They then create an animation of a real starfish by drawing new frames in the color wheel representation, and the model constructs real life frames from each of these new drawings:
What’s versatile about this approach is that the mapping doesn’t need to be from a simplified image representation to the real life image representation. We can go the other way and build an automatic animation pipeline given a single drawn reference frame, as shown in the paper:
The potential of this work for cartoonists, animators, and CGI-artists is that only one image need be animated, and the rest of the animation can then be generated by using some alternative, simplified reference. This is similar in flavour to what Ebsynth does already, but this approach has the capacity to go beyond Ebsynth’s method, which is limited to style-transfer applications. This model still struggles from similar issues that Ebsynth struggles from, such as an inability to generalize beyond images that are close to the given real image. Say our chosen image was a profile shot of a character’s face talking. If we tested our model on a scene where the character rotated its head, the model would fail dramatically. But I can see these issues being ironed out either by providing the model with a few more reference images that cover the variations of poses, or more clever tricks such as artificially changing the camera position of the camera shot with some inverse graphics pipeline. Further, I think some techniques from Ebsynth’s preprocessing pipeline, such as motion fields, could be used to improve the loss definition or provide additional image augmentations for DeepSIM.
Face Me
Let’s explore the use of DeepSIM for animation. That is, let’s take a frame from a real life video as our image and use that to conert the video to a cartoon. The DeepSIM codebase doesn’t have a Google Colab so that it can be trained with speedy GPU hardware. Trying it locally on my machine with an RTX2060 took about 2-3 seconds per training step, so instead I forked a new version of the DeepSIM repository and wrote some Colab-compatiblity code. Running it on a Tesla P100 gave me about a x4-6 speedup with 0.5-1 seconds per iteration. I’ve tried to make the Colab friendly to non-coders so that all you need to do is mount your Google Drive and reference your own database of images. Because my primary focus was to use this for animation of real life images, the code and instructions are biased towards that setup, but if you want some more freedom, either let me know or feel free to have a go at editing it yourself! Pull requests welcome. Let me walk you through some experiments I did in Colab. At the top of this blogpost is a Colab link you can use to access the code to run these experiments yourself.
Let’s Face It
I knew I was going to start with facial animation. There’s a lot of work out there that has done good animation of arbitrary faces and it seems there isn’t much to improve upon. But the reason DeepSIM is useful is that it is very friendly to the artist because it allows the artist to invent their own stylization without being limited by a model’s expertise. A model that can specifically transform a face into a sketch or a cartoon or a Van Gogh painting handicaps the artist from being able to imbue their own style into the animation. For my face animation, I recorded a fifteen second clip of me saying some nonesense. You’ll see in the video that I emphasized my facial expressions on purpose to test the limitations of the model’s capabilities.
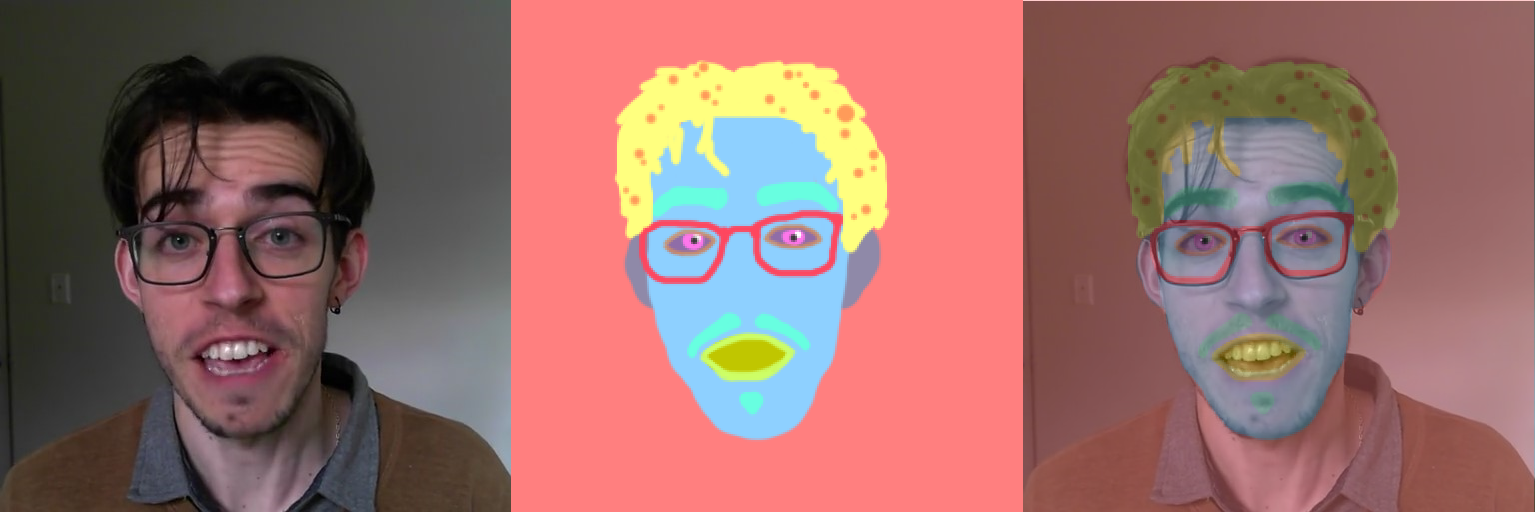
I found a particularly expressive frame that I thought captured the extent of my facial muscles. Choosing the most complex reference frame for the training seemed an important design decision, but how to define ‘complex’ was domain dependent. For faces, an open mouth, eyes, and stretching of eyebrows and cheeks makes creases in the face visible which aren’t there for more casual expressions. It’s easier for the model to remove items it has seen already, such as creases and teeth and eyes, but impossible for it to add something it hasn’t seen. Here’s the frame I chose:

I then graffitied my graceful features with a quirky cartoon person. There has to be some care taken in drawing the animation over the face. During training, the model only learns correlations from pixel colors between the real life image and the cartoon image. This means that landmarks of the animation face should be similar to landmarks on the real face. You could get creative and give yourself horns if you are hornless, or long curly hair if you are short-haired, but don’t expect these to move around much in the final animation because there are no real life parts which are moving that will correlate with these enhancements. So keep any additions grounded to something in the real life image. For example, I over-emphasized my mustache and goattee, but they are grounded by the colouration from where my real life paltry mustache sits on my face, so I expect the two should become correlated.

To add, from my experience, small details such as pupil colors and fun spotted patterns will be challenging for the model to learn when training low-resolution images because the pixel patterns of these features changes quite a bit during augmentation. Although my cartoon face has these, I found they failed to generate well for smaller resolutions as you will see later on. For reference, here’s what these two drawings look like side-by-side and with the cartoon transparently overlaid.
Stunning.
Now you’re all ready to go. Put your real image and cartoon image in their respective folders (see the colab instructions), slide your model into the oven (run the train cell), and wait approximately 3-4 hours before taking it out. Bon appétit!

A nice feature I included in the notebook is that you can terminate the training anytime, run the ‘test cell’ at the end of the notebook to see how your model performs on other frames, and then toggle on the ‘continue_train’ option to restart training right where you left off. This is also a safety net if you get thrown out of your colab session for some reason.
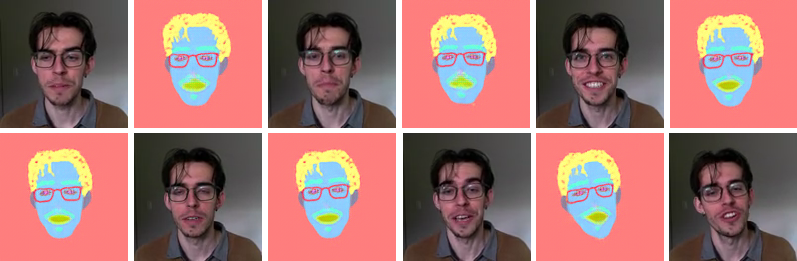
Once the model has finished training, the ‘test cell’ will allow you to apply the model on all the frames of the real life video you want to animate. Just provide the file path to the video file. It was interesting to look at the generated animation results and the real life video side-by-side. Because my animation was only of my head, it was hard to notice that how my head was actually moving while I was speaking. Notice how well the generated animation tracks the shifting of the head and the closing and opening of eyes and the mouth when it had never been trained on a frame with any of these variations.
Some artifacts start to appear as the angle of my head changes but these were understandable given the model was not provided with information different head orientations. One unexpected failure was the interaction between my eyebrows and the rims of my glasses. Because I trained the model on an image where my eyebrows are above my glasses, the model isn’t able to handle the situation where my glasses occlude my eyebrows – it has not learned which goes in front of which, and hence defaults to assuming eybrows are on top of glasses. In hindsight, perhaps using a real life image with the eyebrows behind the glasses would have fixed this problem.
Satanspawn and New Faces
The spline-based augmentations allowed the model to generalize beyond the single real life image by providing a nice distribution for building correlations between two image domains. An obvious extension was to add some color augmentation to help deal with changes in lighting. Say I wanted to reuse this model to animate a second video of myself that I took a week later. The major difference is in the colors of objects in the scene. Here are the results when I tried it with a pre-trained model on the original video:
I was suprised at the quality, but artifacts such as my nice green jumper have leaked through. Not being able to become a blue-skinned yellow-haired cartoon man at any time of day was seeing my future vtube career melt before my eyes. Let’s apply some color changes to the original image during training so the model can potentially handle seasonal fashion. I used the built-in color transformations in the python image library, Pillow. With the flip of an evenly-weighted coin, I would set the brightness of the image in the range [0.3, 1.3], with additional flips for the image’s contrast and saturation. Here are some grotesque transformations that, when coupled with the image deformation, resulted in what can only be described as a creature born from a world of spite and fire:
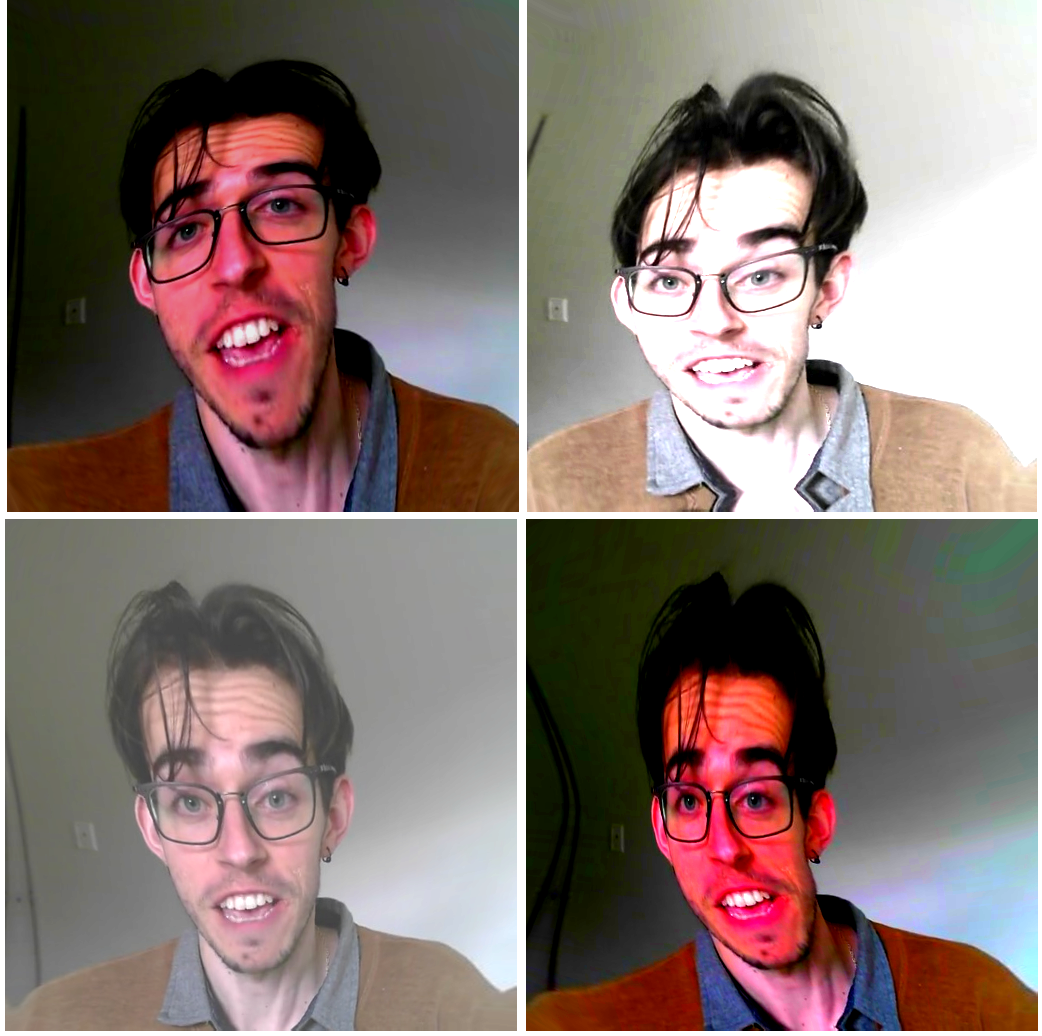
I did a small experiment contrasting three augmentation approaches: spline deformation, spline deformation with color-augmentation, and spline deformation with canny augmentation. Canny augmentation was recommended in the original paper to achieve slightly improved results.
Deformation-only augmentation is on the left, adding canny augmentation is in the middle, and adding color augmentation is on the right. Overall, there are fewer artifacts with the color augmentation, but the effects of using it aren’t staggeringly different. For example, the spotted pattern in my hair is preserved with color augmentation approach and without it the spots are hazey. But how well did color augmentation help with transfering the model to a new video of my head?
Much better! The artifacts are of a different nature this time, but there isn’t anything glaringly obvious like an entire lower-half that leaked through. With some futher tweaks I’m hopeful that a permanent face-transfer model could be built. It might seem unnecessary to spend so much effort on generalization from a single image, when adding more drawn faces from different frames would improve the quality and generalization. But I do think it’s important that if animators and designers are looking to iterate on a massive scale, removing the lighting and scene constraints and being able to work from one drawn frame would accelerate the creative process.
Throwing Apples and Spherical Cucumbers
Let’s try something other than faces and see how far this DeepSIM model can be pushed. My brother and I recorded a short video of him juggling an apple and two cucumbers (side note: spherical cucumbers were a new discovery for me as well). Let’s see if DeepSIM can convert the real-life fruit and veg into cartoon blobs, given only a single frame as a reference. It turns out it can do this reasonably well. Here is the result:
Once the juggler moves out of frame, we can see the model desperately tries to hang on to any notion of a stable reality by converting the clock on the wall into a ghostly fragment. But the tracking of the cucumbers and apples is delightfully wobbly. One thing I noticed was that early in training, the model handled occlusions of the face by the juggled nicely by prioritizing the object first and drawing it in front of the face. But, after training was complete, the model flipped, and drew the face over the object thrown in front of it. This is a potential sign of the model overfitting to the face. I think with some more tweaking and a few other augmentations, and this pipeline could work comfortably for building your own animated cartoons.
Discussion
![]()
That concludes everything I wanted to present about how I started experimenting with DeepSIM for cartoon animation. I have a backlog of other DeepSIM applications I’ve been exploring, but I’ll leave those for a future post. Here I wanted to introduce the Colab notebook so others could try DeepSIM, and focus on its application for animated cartoons. Overall, I’m excited about where this DeepSIM research is leading us. I can see many improvements and variations on this design that would lend well to much higher quality animation. Considering that the turnaround for research in the animation world has been surprisingly short – the research behind Ebsynth was only published in 2019 and is already gaining popularity – I wouldn’t be suprised to see this technology either being incorporated by Ebsynth, or replacing it. Some things I think are worth trying:
-
Exploring full-body animations of people in a scene. I have a friend who wants to me to try to animate him playing tennis. Tracking both the full-body motion and the balls would be a nice stress test. Of course, one thing is that pose-estimators can do a pretty good job at tracking a human in motion given a fixed reference frame. Animating non-humans and more complex moving objects would be an application where DeepSIM shines.
-
More experiments with handling changing lighting conditions. Once I train a model from an image of my face taking in the morning, I can’t then record a new video of me in the evening and expect that video to work. I tried different lighting and color augmentations as a solution, but it wasn’t perfect.
-
Settings involving humans usually have better solutions where some pose-estimation of the face or body is used to pre-process the data. Therefore it would be fun to push this model beyond face/body capture and do something like video a landscape of trees as it is beaten by weather and see how the animation holds up.
-
Parallel face-baking! I want to be 4, no 8, no 128 characters all at once for my future feature-length animated film releasing in 2083. Batch-training on all these character face types at once and including a one-hot feature vector to distinguish them would make much better use of the GPU parallelization than training one character per model.
Keep an eye out for future posts as I’ll be exploring some of these over the coming weeks. Until next time.